Guide
How to Control Lighting in AI Images Without Guesswork
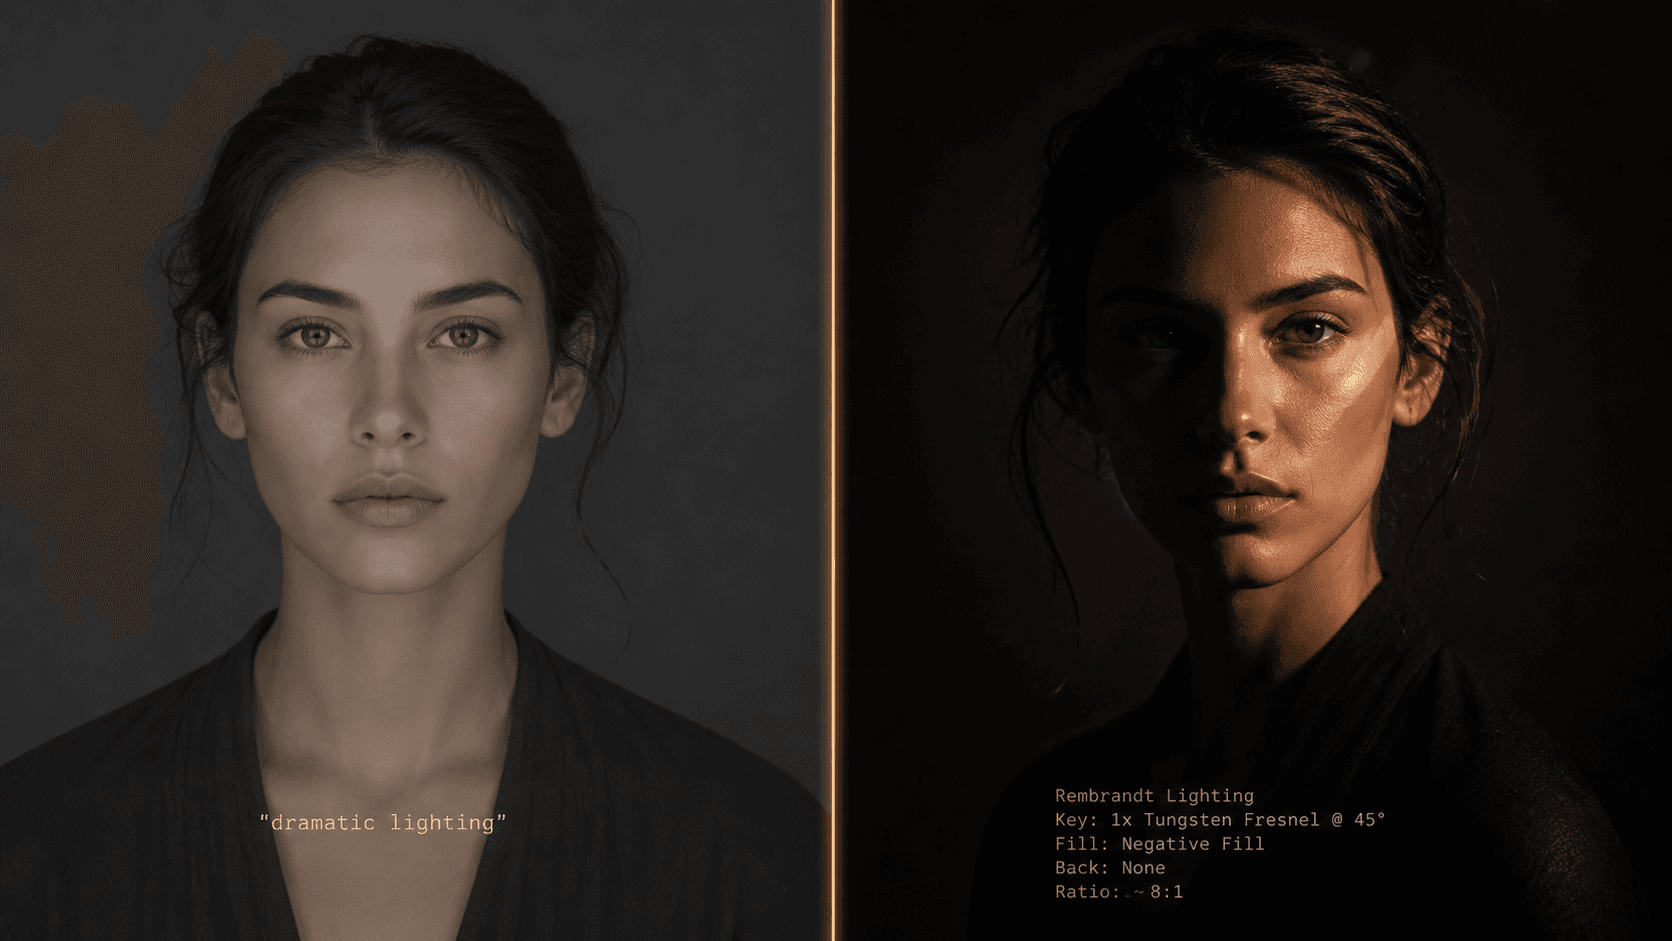
Writing "dramatic lighting" gets you nothing reliable. Lighting in AI prompts is a physics problem, not an adjective problem. Here's the framework I use for precise control.
Published May 5, 2026
I have a folder on my desktop called "lighting_failures." It has 340 images in it. Every single one of them came from a period of about six weeks where I was writing prompts like a copywriter instead of a photographer — describing the feeling of light rather than the physics of it.
A client had commissioned a series of executive portrait headshots for a corporate rebrand. The brief was clear: Rembrandt lighting, dark background, strong presence. I wrote "dramatic Rembrandt lighting, dark moody atmosphere, professional studio portrait" and got back something that looked like a competent stock photo. Good exposure. Flat. Nothing even close to the specific triangular shadow patch on the cheek that defines actual Rembrandt lighting.
The problem was not the model. The problem was that "Rembrandt lighting" is a historical reference name, not a physical description. The model had seen thousands of images tagged with that name — but averaging them produced something generic. I needed to stop naming lighting styles and start describing the physics.
Why "Dramatic Lighting" Is Meaningless to a Diffusion Model
When you write "dramatic lighting," the model does not visualise a specific light position, quality, or colour temperature. It pattern-matches against every training image tagged with words that cluster around "dramatic" — which statistically averages toward high contrast, dark backgrounds, and a single warm source somewhere above and to the side of the subject. That average is not dramatic. It is the arithmetic mean of dramatic, which is thoroughly unremarkable.
The diffusion process is fundamentally a probability exercise. The model is constantly asking: given these tokens, what pixel configuration is most statistically likely? Vague lighting descriptors have enormous associated pixel variance in training data — "moody" could mean golden hour, candlelight, deep shadow, overcast daylight, or a hundred other configurations. The model hedges. It picks something in the middle.
The fix is to collapse that variance by specifying the physical components that actually determine what light looks like in a photograph. When you describe light as a real-world physicist or photographer would — source, position, quality, temperature, and interaction with surfaces — the model has enough constraint to render something specific rather than statistical.
This is also why Flux 2 Pro handles lighting prompts more accurately than Midjourney for technical shots. Flux's architecture is more instruction-literal, so physics descriptions produce physically accurate results more consistently. Midjourney's interpretive system can fill gaps creatively — which is both its strength and its lighting liability.
The Five-Component Lighting Framework
Through two years of iterating portrait, product, and architectural prompts, I landed on five components that, used together, completely specify a lighting setup. I think of them as SQTSI: Source, Quality, Temperature, Shadow, and Interaction.
Once you have all five, you stop guessing.
Component 1: Source — Name the Physical Object
This is the single highest-impact change most people can make. Stop using adjective lighting names and name the physical light source instead.
The model has been trained on millions of photography-related images with technical metadata. When you name a real light source, you activate that specific optical cluster from training data:
single bare strobe— hard light, harsh shadows, sharp specular highlights
large octabox softbox— soft wrap light, gentle shadows, flattering fill
north-facing window— diffused daylight, cool temperature, soft directional quality
practical incandescent lamp in background— warm rim or ambient contamination
overcast sky— omnidirectional soft fill, almost no shadow
The source name tells the model what kind of light physics to simulate before you have specified anything else.
Component 2: Quality — Hard vs. Soft
Light quality is determined by the ratio of source size to subject distance. A large source close to the subject is soft (big octabox near a face). A small source far from the subject is hard (direct sun, bare bulb, focused spotlight). Specify it explicitly:
- Hard:
sharp shadow edges,high contrast falloff,bare bulb quality
- Soft:
gradual shadow transition,wrap lighting,diffused source
Component 3: Temperature — Colour of the Light
Colour temperature determines the emotional register of the image more than almost any other variable. Specify it in Kelvin and the model knows exactly what colour cast to apply:
2700K— warm incandescent, candlelight quality, amber tones
3200K— tungsten studio light, warm but clean
5600K— standard daylight, neutral white
7000K+— overcast/open shade, blue-cool, slightly melancholic quality
You can also name the source's colour temperature by reference: warm tungsten 3200K or cool overcast 6500K. Both work. The Kelvin number adds precision if the reference term is ambiguous.
Component 4: Shadow — Direction and Geometry
This is where most lighting prompts completely break down. Shadow direction and geometry are the entire visual information of a lighting setup, and almost nobody specifies them.
Describe shadow as an angle and a side: shadow falling diagonally from left shoulder across chest to right hip. Name the geometric pattern if there is one: Rembrandt triangle on right cheek, butterfly shadow below nose, split lighting with sharp vertical shadow dividing face. Specify fill or its absence: no fill light, deep shadow on unlit side versus subtle bounce fill from camera-right.
Component 5: Interaction — What the Light Does to Surfaces
This component separates photorealistic outputs from renders. Specify how light interacts with the specific materials in your image:
- On skin:
subsurface scatter visible on ear and nose tip,specular highlight on forehead
- On fabric:
light absorption in dark ribbed texture, no specular,sheen on satin at highlight edge
- On products:
clean specular on curved metal surface,diffuse reflection on matte ceramic
Before and After: The Framework in Practice
Here is the same portrait prompt written both ways:
Bad prompt (adjective-based lighting, no physics):
dramatic Rembrandt lighting portrait of a man, moody dark atmosphere, professional studio shot, cinematic, high quality --ar 4:5 --style raw
Good prompt (SQTSI framework applied):
close-up portrait of a South Asian man, aged 35, dark structured blazer, single bare strobe from camera-left at 45 degrees elevation, hard light quality with sharp shadow edges, warm tungsten 3200K, Rembrandt triangle shadow on right cheek, deep shadow on right side of face with no fill, subsurface scatter visible at ear, deep neutral-grey seamless background, 85mm f/1.8, photorealistic --ar 4:5 --style raw --hd
The second prompt is longer, but every additional element is load-bearing. The strobe specifies source and hardness simultaneously. The 45-degree position determines shadow angle. The 3200K grounds the colour. The explicit Rembrandt triangle description tells the model exactly which shadow geometry to produce — rather than asking it to guess what "Rembrandt" means from a statistical average.
Second example — product shot where flat lighting killed the shot:
Bad prompt (no source, quality, or interaction specified):
luxury perfume bottle product photography, beautiful lighting, white background, high quality commercial shot --ar 1:1 --style raw
Good prompt (full lighting specification):
luxury cylindrical glass perfume bottle on white acrylic pedestal, single large octabox overhead slightly forward at 75 degrees elevation, soft light quality with gradual shadow transition beneath bottle, neutral 5600K daylight temperature, clean elongated specular highlight running vertically along curved glass surface, slight caustic light scatter on white surface from bottle refraction, white seamless background, 100mm macro equivalent f/5.6, commercial product photography --ar 1:1 --style raw --hd
The caustic light scatter term in that second prompt is doing specific optical work — caustics are the curved light patterns that glass and water project onto surfaces behind them. The model has abundant photography training data for this. Naming it explicitly produces the effect with high reliability.
Real-World Gotchas — My Personal Take
--style raw is non-negotiable for lighting accuracy on Midjourney. Without it, Midjourney's aesthetic post-processing often brightens shadows, adds artificial fill, and smooths out exactly the shadow geometry you worked to specify. Standard mode is trying to make things look pretty by its own definition. Raw mode respects your physics description.
Kelvin values above 7500K produce inconsistent results. I have noticed the model starts interpreting very high temperature values as "night scene" or "fluorescent office" rather than as a specific colour temperature. If you need very cool light, overcast sky quality, cool blue-white light works more reliably than a raw Kelvin number above 7500.
Flux 2 Pro handles the SQTSI framework better than Midjourney for product shots. For portraits, Midjourney v8.1 still produces more aesthetically refined results — but for any shot where optical accuracy matters (glass, metal, specular surfaces), Flux's literal instruction following means the lighting physics lands more precisely. I use both in my workflow depending on the job type.
Specifying too many simultaneous light sources breaks the model's coherence. I have tried to describe three-light setups (key, fill, and rim simultaneously) in a single prompt and the model regularly fails to reconcile the competing shadow geometries. The outputs look internally inconsistent — shadows pointing in directions the specified sources could not produce. For multi-light setups, start with your key light fully specified, get a result you are happy with, then use Vary (Subtle) with an amended prompt that adds the secondary source. One light at a time builds to a coherent result.
Conclusion
Lighting in AI prompts is not a vocabulary problem — it is a specificity problem. The five components (source, quality, temperature, shadow, and interaction) give the model enough physical constraint to render what you actually briefed rather than what it statistically averages from vague emotional descriptors. Apply the framework to a prompt you have been struggling with, and the output difference will be immediate. The AIPromptHub gallery has documented lighting-specific prompts across portrait and product categories with expected outputs noted — useful as a calibration reference when you are dialling in a new setup.