Guide
Midjourney CREF Guide: Creating Consistent Character Sheets with Multiple Poses
Midjourney generates a different-looking character every single time—until you learn --cref. This guide covers the exact workflow to lock identity across every pose.
Published June 21, 2026
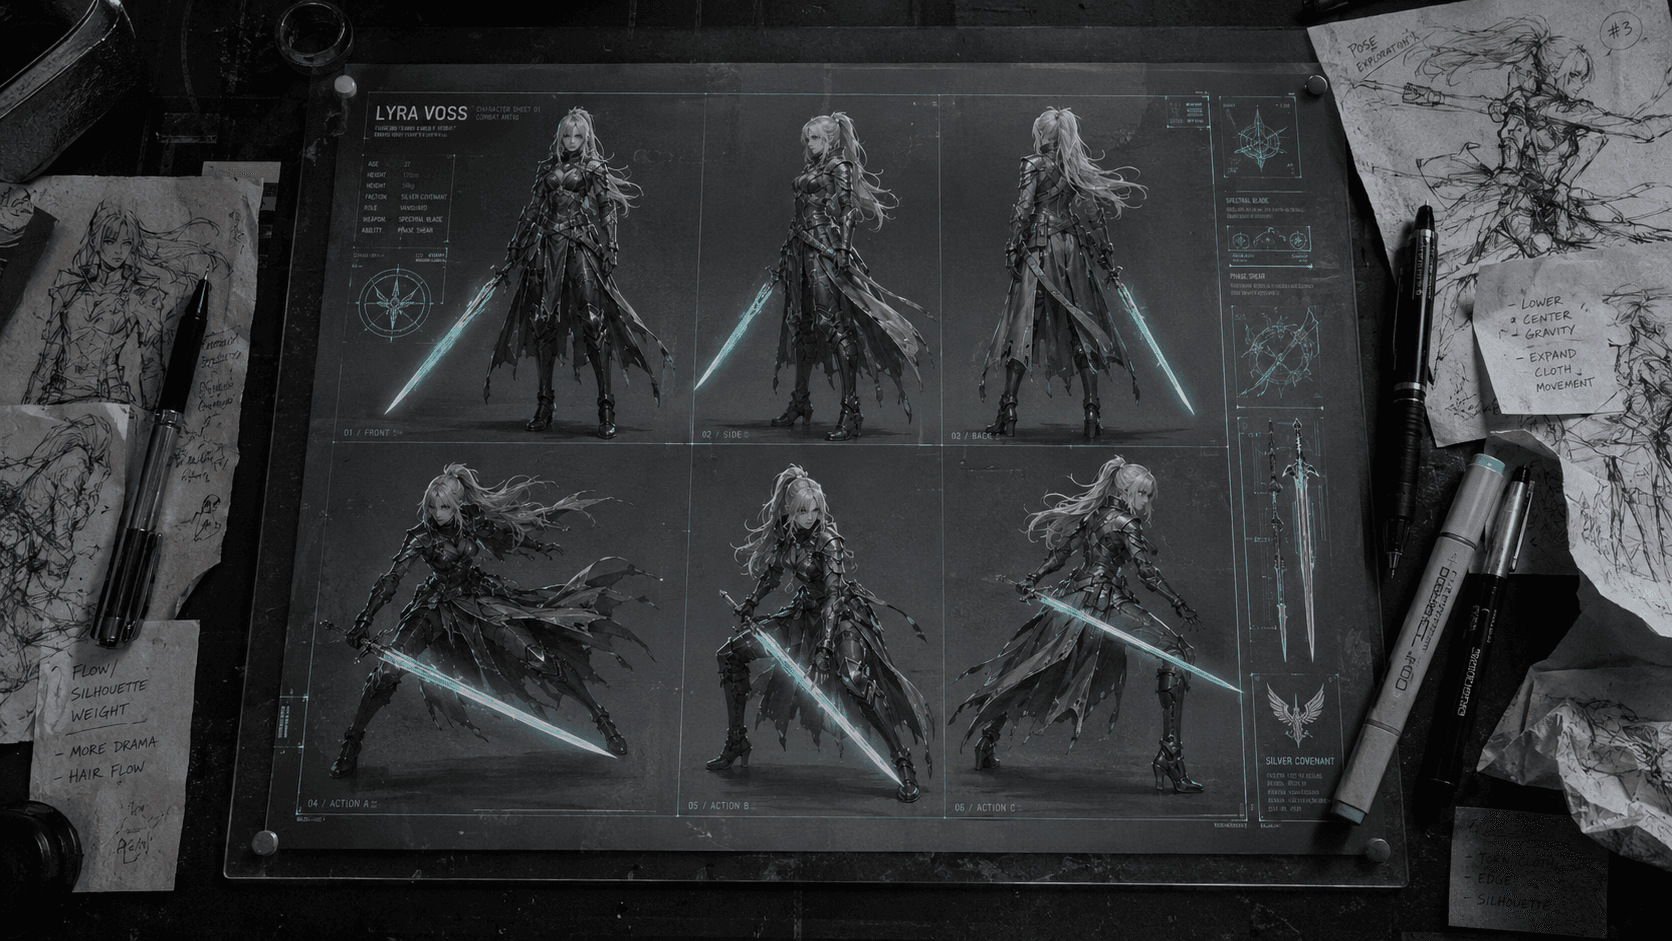
# How I Create AI Character Sheets with Consistent Multiple Poses Using Midjourney CREF Last month I was packaging a Fiverr delivery — a full character roster for an indie RPG client, six characters, four poses each. Twenty-four images that all needed to look like they came from the same art bible. By the third character I was ready to throw the whole project into ComfyUI because Midjourney kept doing what it always does: every time I tried a new pose, the character looked like a sibling. Not the same person. A sibling. That's the real frustration with Midjourney for any kind of character work. The model has no session memory. It doesn't know — or care — what your warrior looked like two prompts ago. For a standalone illustration, that randomness is fine. For a character sheet with a front, side, back, and action pose, it's a production blocker. `--cref` (Character Reference) fixed most of that problem for me. Not all of it — I'll be honest about the gaps — but enough to make professional character sheet delivery actually sustainable. ## Why Midjourney Keeps Changing Your Character Worth understanding the mechanics here, because knowing *why* it happens tells you exactly what `--cref` is fixing. Midjourney is a latent diffusion model. Every generation starts from a patch of random noise and progressively denoises toward your text prompt. The `--seed` parameter controls where that noise starts, which is why locking the seed gives you similar *compositions* — but it doesn't lock character *identity*. Faces are high-frequency detail regions with massive variance in the training data. Two runs with identical text and the same seed will still produce subtly different jaw shapes, eye spacing, and nose bridges. Before `--cref` existed, people fought this with increasingly desperate workarounds: - **Hyper-descriptive prompt stacking**: `"square jaw, scar above left eyebrow, heterochromia — right eye amber left eye ice blue, short black undercut with shaved sides"` — this works until the model decides to interpret one of those tokens differently - **img2img chaining**: feeding each generation back as an image prompt, which causes progressive quality degradation and style creep after 2–3 iterations - **Seed + strong style lock**: helped with composition, barely touched facial identity `--cref` is different in kind, not just degree. You're giving the model a **visual conditioning input** — a source image it uses to extract facial structure, hairstyle, and costume elements. That extracted identity gets baked into the denoising process, not just tokenized as text. It's closer to how ControlNet conditions a generation than how a text description does. The companion parameter is `--cw` (Character Weight), which runs from 0 to 100: - `--cw 0` — Only the face transfers. Outfit, proportions, and accessories float freely. - `--cw 100` — Full character locked: face, hair, outfit, accessories, everything the model can hold onto. For character sheets, I stay in the **75–95 range**. 100 sometimes makes the pose generation feel stiff — the model is working so hard to match the reference that it compromises the action. ## The Exact Workflow I Use ### Step 1: Build Your "Hero Shot" Reference First Do not start with poses. Start with a single, clean, front-facing full-body portrait — neutral stance, neutral lighting, isolated background. This becomes the anchor image for every other generation. ``` ❌ Bad Reference Prompt (too much action for a clean identity anchor): a fierce female warrior lunging forward with a glowing sword, dramatic low angle, volumetric rim lighting, cinematic framing --ar 2:3 --v 6.1 ``` ``` ✅ Good Reference Prompt (clean identity, extractable features): full body character concept, female warrior, short silver hair with undercut, violet eyes, dark leather armor with gold pauldrons and chest trim, neutral front-facing T-pose, plain white studio background, sharp clean lines, concept art style --ar 2:3 --style raw --v 6.1 --q 2 ``` The white/neutral background is not optional. Busy environments bleed into the CREF extraction — I had a forest background once where Midjourney started reading the bark texture and subtly adding it to the character's skin in follow-up generations. Sounds insane but I have screenshots. Once you have a hero shot you're happy with: right-click (in Discord) or long-press (in the web UI) → copy image URL. That CDN link is your `--cref` value. ### Step 2: Generate Pose Variants With the Reference Locked The syntax is straightforward: ``` [pose/action description] --cref [YOUR CDN URL] --cw 85 --ar 2:3 --style raw --v 6.1 ``` Here's a direct before/after from the RPG project: ``` ❌ Before (no CREF — different character every generation): female warrior in a dynamic running pose, dark leather armor with gold trim, fantasy RPG character art, full body --ar 2:3 --v 6.1 ``` ``` ✅ After (CREF active, same character holds): female warrior in a dynamic running pose, arms pumping, weight on left foot --cref https://cdn.midjourney.com/[your-image-id]/0_0.png --cw 85 --ar 2:3 --style raw --v 6.1 ``` Notice I stripped most of the character descriptor clutter from the "after" prompt. That's deliberate. When `--cref` is active, the reference image is already handling the character description visually. The text prompt should focus on **action and composition** — what the character is *doing*, not what they look like. Over-prompting character attributes while CREF is running creates token conflicts. I've had the model get genuinely confused between "violet eyes" in the prompt and the eye color in the reference and produce this weird muddy teal that satisfied neither. Let the image do the character work. ### Step 3: Generate All Six Poses and Assemble in Figma For a full character sheet I generate these separately: - Front facing (already done — this is your reference image) - 3/4 front angle - Side profile - Back view - Idle / relaxed pose - Action / combat pose Six separate generations, all using the same `--cref` URL and consistent `--cw` value. Then I pull all six into Figma and arrange the grid there. Do **not** try to generate the sheet as a single Midjourney image — the model handles multi-panel grids poorly, and character consistency degrades when you try to cram multiple poses into one generation. I've tried. It's not worth it. ### Real-World Gotchas / My Personal Take I want to be straight with you on where this still breaks down, because most tutorials stop before this part. **The back view is always the weakest.** Midjourney has thin training data for back-facing characters with maintained identity. The armor shape holds reasonably well, but the hair silhouette drifts. I usually generate 5–6 back view variants and cherry-pick the closest one. **Extreme angles kill facial consistency.** A 3/4 profile works fine. A sharp 90-degree side profile — especially facing right — frequently gets the eye shape wrong relative to the reference. At that point you're either accepting the variance or doing a Photoshop pass on the face. **The CDN URL expires.** Midjourney's Discord CDN links are not permanent. If you're building a project across multiple sessions — which you will be on any real project — download the reference image locally after each session and re-upload to get a fresh URL. I lost three sessions of consistency on a client project before I figured this out. **Upscale your reference before feeding it back.** A higher-resolution hero shot gives the model more identity detail to extract. Run a Subtle upscale (in the web UI) or U1/U2 in Discord before using any image as a `--cref` source. This one change noticeably tightened my facial consistency. **Don't pull CREF sources from someone else's generations.** Using popular character images from Midjourney Discord as your anchor bakes in their style decisions, proportions, and whatever else is embedded in that image. The output will drift toward their aesthetic whether you want it to or not. Always generate your own clean hero shot. ## Wrapping Up `--cref` is the closest thing Midjourney has to real character persistence right now, and when the setup is right — clean hero shot, neutral background, CREF anchored, `--cw` dialed in — you can produce a client-deliverable character sheet without the four-hour re-prompting spiral. The gaps that remain (back view variance, extreme angle drift) still need cleanup in Photoshop, but you're talking 20–30 minutes of touch-up rather than rebuilding from scratch. For professional character work, that's the workflow until something better ships.